Tuesday, May 31, 2011

Fresh Mint Limeade

Yesterday was Memorial Day, and to commemorate the holiday, Robert and I hosted some friends for a cookout to celebrate the beginning of summer. I mentioned to Robert earlier in the weekend that somehow it just doesn't feel like memorial weekend without burgers on the grill and friends to enjoy them with and before I knew it, he was orchestrating such an event! What a sweet husband!

While beer is always a natural pairing with burgers, I decided I wanted to have a beverage available that was refreshing and non-alcoholic for our guests who choose not to drink alcohol. This recipe was inspired by the limeade offered at one of my favorite latin restaurants here in Dallas, Gloria's. I recently left my job at the City of Dallas for a new career in consulting, and on my last day at the City, my friends and colleagues threw me a surprise farewell lunch at Gloria's. It was a treat. During that lunch I had their limeade which included fresh mint. What a revelation! It was just like a virgin mojito only more refreshing.

I knew then that I had to try my hand at making my own version, this recipe is the result of my efforts. I think it tastes cool and refreshing and would be perfect when enjoyed by the pool under the hot, summer sun. If you have an aversion to mint or are allergic, you could easily omit it and the limeade would still be delightful by itself.

Since this recipe includes tonic water, I want to take a minute to give my personal opinion on what brand to use. In most grocery stores you have three options when it comes to tonic water: Canada Dry, Schwepps and generic. No matter how much you may be tempted by the price, do not get the generic your drink will definitely suffer. Additionally, Schwepps has a far superior taste than Canada Dry. So, if you want to do this beverage its proper justice, or any other tonic based drink for that matter, the only option is Schwepps. Ok, I'll get down off my soap box and continue with the recipe.

Printer Friendly Version

Fresh Mint Limeade
Ingredients
1/2 cup water
1/2 cup sugar8 small limes, juiced plus more for the glasses
6 cups water
2 cups tonic water
fresh mint leaves

Instructions
In a small saucepan combine the 1/2 cup water and 1/2 cup sugar.
Bring to a boil to completely melt the sugar.
Set the simple syrup aside and let cool before moving forward.
Meanwhile, juice the 8 limes to make about 3/4 cup lime juice.
Pour into a half gallon pitcher.
Add 6 cups of water,
2 cups of tonic water,
and the half cup of simple syrup. Stir to combine.
In a glass, place 5 mint leaves in the bottom.
Using a muddler, or the handle end of a wooden spoon, muddle the mint leaves to release their oil.
Depending on the size of your glass add a quarter or a half of a lime to the mint and muddle as well.
Top off with ice.
Pour in the limeade and stir to incorporate the muddled mint and lime. Enjoy!
 I thought I'd also include a picture of Robert enjoying his glass. He agrees, pure refreshment!
Stay tuned tomorrow for the blue cheese burger recipe we enjoyed last night as well. Trust me, it's a keeper!

Monday, May 30, 2011

The Place at Perrys: Not a place to which we will return

A climbing antique rose from my rose garden.

May 26th, a Thursday night, was our four year anniversary! I really cannot believe that it has been four years. The years have really gone by in a quick breath, and yet it also seems like we have gone through so much and really grown up together in the past four years. I am big on anniversaries and birthdays and things like that, I think that they should be remembered and special, something to look forward to with anticipation and look back upon with smiles and lovely thoughts. I am sad to report, that this May 26th was not one of those happily remembered anniversaries. Without sharing too much, we have had a very hard year. Our hearts were broken by the loss of our daughter early this year, something from which I know our hearts will never fully heal, never be full again. We have grown together through our loss, and are now closer than I imagine two people could ever be. We are only four years into our marriage, but I feel as though we have been together fifty years, forever bound together as one.

A picture from our wedding day.
We really wanted to treat ourselves to a quiet and intimate evening this year, and as we have just recently returned to Dallas, we were not really sure where to go for our special evening. We settled upon The Place at Perry's on Cedar Springs. We went to this restaurant, when it was known simply as Perry's, for many special events when we lived in Uptown about four years ago, and we had really not been since then. We thought this would be a wonderful place to go, as we had so many happy memories with family and friends, surely it would be the perfect venue! Well, we were sadly mistaken.

Upon entering the restaurant I noticed a different ambiance, not based on changed decor or table settings, but based upon the clientele and the large number of people at the bar and a pharmaceuticals power point presentation in the large seating area. Due to this presentation we were seated off in a dark corner, which at first I thought was great so that we would have a nice quiet evening. However, we quickly realized that our evening would not be quiet, as those sitting next to us were some rather over-served guests who were basically yelling  at each other the whole evening! Also, despite the fact that there were relatively few diners, our waiter took about 10 to 15 minutes to come to our table to ask for our drink order. The rest of the evening just went down from there: didn't have the wine we wanted, the waiter seemed irritated we had delayed his exit for a date or something far more interesting then us, my Cesar salad seemed as though it was from an out of the bag mix preparation, the bisque was just not quite right, Bunker's potatoes au gratin were really just sliced potatoes topped with sandwich sliced cheddar cheese and about a cup of oil, Bunker's bone-in was about half fat, and the bread was almost stale! On the other hand, my steak (Filet Mignon, rare plus) was actually delicious and perfectly prepared as were my whipped potatoes. I hate to give such a bad review, but I really was so disappointed, we so wanted and needed a nice evening where we felt taken care of, and that just did not happen. I suppose this is now just a restaurant, and not a place you go for a lovely evening or a speical memory. Very dissapointing. So much so, that we are actually on our way out to dinner this evening for an anniversary dinner re-do! We are going to Fearings at the Ritz......pretty positive this will give us the evening we so very much wanted on Thursday night!

So take this post for what it is worth, perhaps we hit The Place at Perry's on a bad night, perhaps we were not in the best moods, but regarless, we will not be returning. I hope you can take away that you can always re-do a special evening!

Also, hold those whom you love close to your hearts and hold their hands whenever you can.
Sleepy Shafer.

Thursday, May 26, 2011

Grilled Prosciutto Wrapped Stuffed Chicken Breasts

Robert and I are currently housesitting for his parents while they are vacationing in Colorado. One main benefit is the use of their beautiful backyard and grill. And with the weather in Dallas currently in the wonderful pre-summer heat stage, we are using every available opportunity to utilize the backyard as much as possible. This means that I have become a grilling machine!

The most recent grilling exploration comes from Fine Cooking magazine and reminds me of an Italian inside out chicken cordon bleu. The combination of the prosciutto, chicken, mozzarella, basil and tomatoes is a delicious combination and reminds me of one of my favorite paninis. The tomatoes were my addition and I think it makes a big difference. I used cherry tomatoes this time, but I think sliced roma tomatoes would also be delicious. Finally, the original recipe called for only 4 slices of prosciutto which I found to be half the amount needed so I've made changes to the recipe here to reflect that change.

Printer Friendly Version
Grilled Prosciutto Wrapped Stuffed Chicken Breasts


Ingredients
1/2 pound fresh mozzarella cheese, thinly sliced
10 fresh basil leaves, cut into chiffonade strips
8-10 cherry tomatoes, halved
4 boneless, skinless chicken breast halves
8 thin slices of prosciutto
salt
pepper

Instructions
Slice the mozzarella cheese into thin slices and set aside.
Cut the basil leaves into chiffonade and add to the cheese.
Cut the tomatoes in half and add to the cheese and basil.

Trim any excess fat from the chicken breast halves and butterfly each one.
Season with salt and pepper and layer the mozzarella, basil and tomatoes on one side, being careful not to over-stuff.
Fold over the other side of the breast to enclose the filling within.
Take two of the prosciutto slices and wrap them around the breast.
When done, the prosciutto should completely incase the chicken.
Heat the grill to medium. When heated, take a paper towel dipped in olive oil and rub on the grill grates to help avoid sticking. Place the chicken breasts on the grill. (You can see in this picture how I ran out of prosciutto for all the chicken)
Close the grill cover and cook the chicken for 7 minutes, allowing the chicken to be marked by the grill.
Turn over and cook for 12 more minutes, turning every 4 minutes, until the chicken is cooked through.
Serve with your favorite side dishes and enjoy.
Source: Adapted from Fine Cooking magazine

Tuesday, May 24, 2011

Tuscan Roasted Chicken and Vegetables

It's no secret that my protein of choice for cooking is chicken, more specifically, chicken breasts, and as such, I am always on the lookout for a new and fresh way to prepare chicken for dinner. Unfortunately, it's easy to get in a rut of boring, boneless skinless chicken breast recipes, if you're not careful. This used to be a more common issue for me than it is now. The main reason for this is that I used to be reluctant to try any recipe that asked for anything other than boneless skinless chicken breasts. Oh my, was I missing out!

The use of skinless bone-in chicken breasts in this recipe is a big part of what makes it so delicious. All that time I spent avoiding recipes that kept the bone I was missing out on so much moisture and flavor! What a waste. The aroma of the fennel and lemon as the meal roasts in the oven is inviting and only makes you want to rush the cooking process. Don't fall into this temptation! It is well worth the wait when you taste the tenderness that is a result of the longer time in the oven.

Tuscan Roasted Chicken and Vegetables

Ingredients
6 roma tomatoes
3 medium zucchini
1 bulb fennel
4 bone-in chicken breast halves, skin removed
3 tablespoons olive oil, divided
3/4 teaspoons salt, divided
1 shallot, minced
1 lemon, zested and juiced
1 teaspoon fresh chopped rosemary

Instructions
Preheat the oven to 375 degrees. Begin by cutting the tomatoes into quarters lengthwise and removing the seeds. Place in a large baking dish and set aside.
Trim the edges of the zucchini, cut in half crosswise and cut each half into half lengthwise resulting in quarters all roughly the same size. Add to the tomatoes.
Remove the outer layer from the fennel bulb and discard.
Cut off the long stems, leaving only a small amount and discard. Cut the remaining fennel bulb into 8 wedges so that each one is held together by a piece of the remaining stem. Add to the tomatoes and zucchini.
Add two tablespoons of olive oil and 1/4 teaspoon of salt to the vegetables. Toss to coat.
Place the chicken breasts, skin removed, on top of the vegetables.
Mince the shallot and place in a small bowl.
Add the lemon zest,
lemon juice,
remaining tablespoon of olive oil,
and salt and pepper.
Stir together to combine.
Rub the mixture into the chicken breasts.
Place in the oven and cook for 30 minutes. Remove and stir the vegetables and return to the oven for 30 more minutes. When done, the chicken should be browned and the veggies tender.
Source: Adapted from Ellie Krieger


Monday, May 23, 2011

Handmade Pasta with Pancetta and Cherry Tomatoes

Bunker was busy working at home in his office most of Saturday, therefore, I was trying to keep myself busy while still being at home. I don't know why, but I decided handmade pasta sounded like a great and easy idea. So, it was a great idea, and actually easier than I expected! Granted, this is the meal that we ate at 9:30 at night!

This delicious and warming dish is from Bon Appetit, and I made very few changes, of which I will note below. You could easily make this fairly easy sauce and use it on store bought pasta. I will say, handmade pasta is incredibly delicate, soft, and almost has a melting quality. The handmade pasta really elevates a simple pasta dish and sauce to an elegant and velvety textured dinner worth savoring. Enjoy!

Printer Friendly Version

Ingredients for Pasta:
2 cups of all-purpose flour
1 cup of hot water
4 teaspoons
A pinch of salt

Ingredients for Sauce:
1 tablespoon of olive oil and some sprays of Pam Spray
1/2 cup chopped white onion (I actually used Sweet Vidalia as that is what I had in my fridge)
1/2 cup chopped pancetta
1/2 cup white wine (I added this to the recipe to deglaze the pan)
1/4 cup red pepper flakes (the original recipe called for cracked black pepper)
4 cups small cherry tomatoes, halved (original reprice called for 3 cups, but I really like tomatoes!)
1 cup of tomato sauce (the small cans you find alongside the canned tomatoes, I used Hunts)
16 fresh basil leaves
2 teaspoons chopped fresh oregano

Steps for Pasta:
1. Put two cups of flour in a large bowl with a well in the center.

2. Add half a cup of hot water, four teaspoons of olive oil and a pinch of salt into the flour well.

3. Gradually mix the flour into the wet ingredients in the center of the flour well.

4. Add the final half a cup of hot water to the dough until a soft dough forms.


5. Turn the dough out onto a lightly floured surface and knead the dough and add a small amount of flour to the dough to remove the stickiness. This should take about 5 minutes. I don't know if you have caught on or yet by now...but I love kneading dough...there is just something about the texture, the process, the guaranteed results, the dedicated time..very comforting.

6. Form the dough into a ball and place the dough in a bowl. Cover this bowl and let it rest for about an hour.


Don't you just love this tea towel! My mom gave it to me when Bunker and I were living in North Carolina. A little touch of Texas can make any day better :)

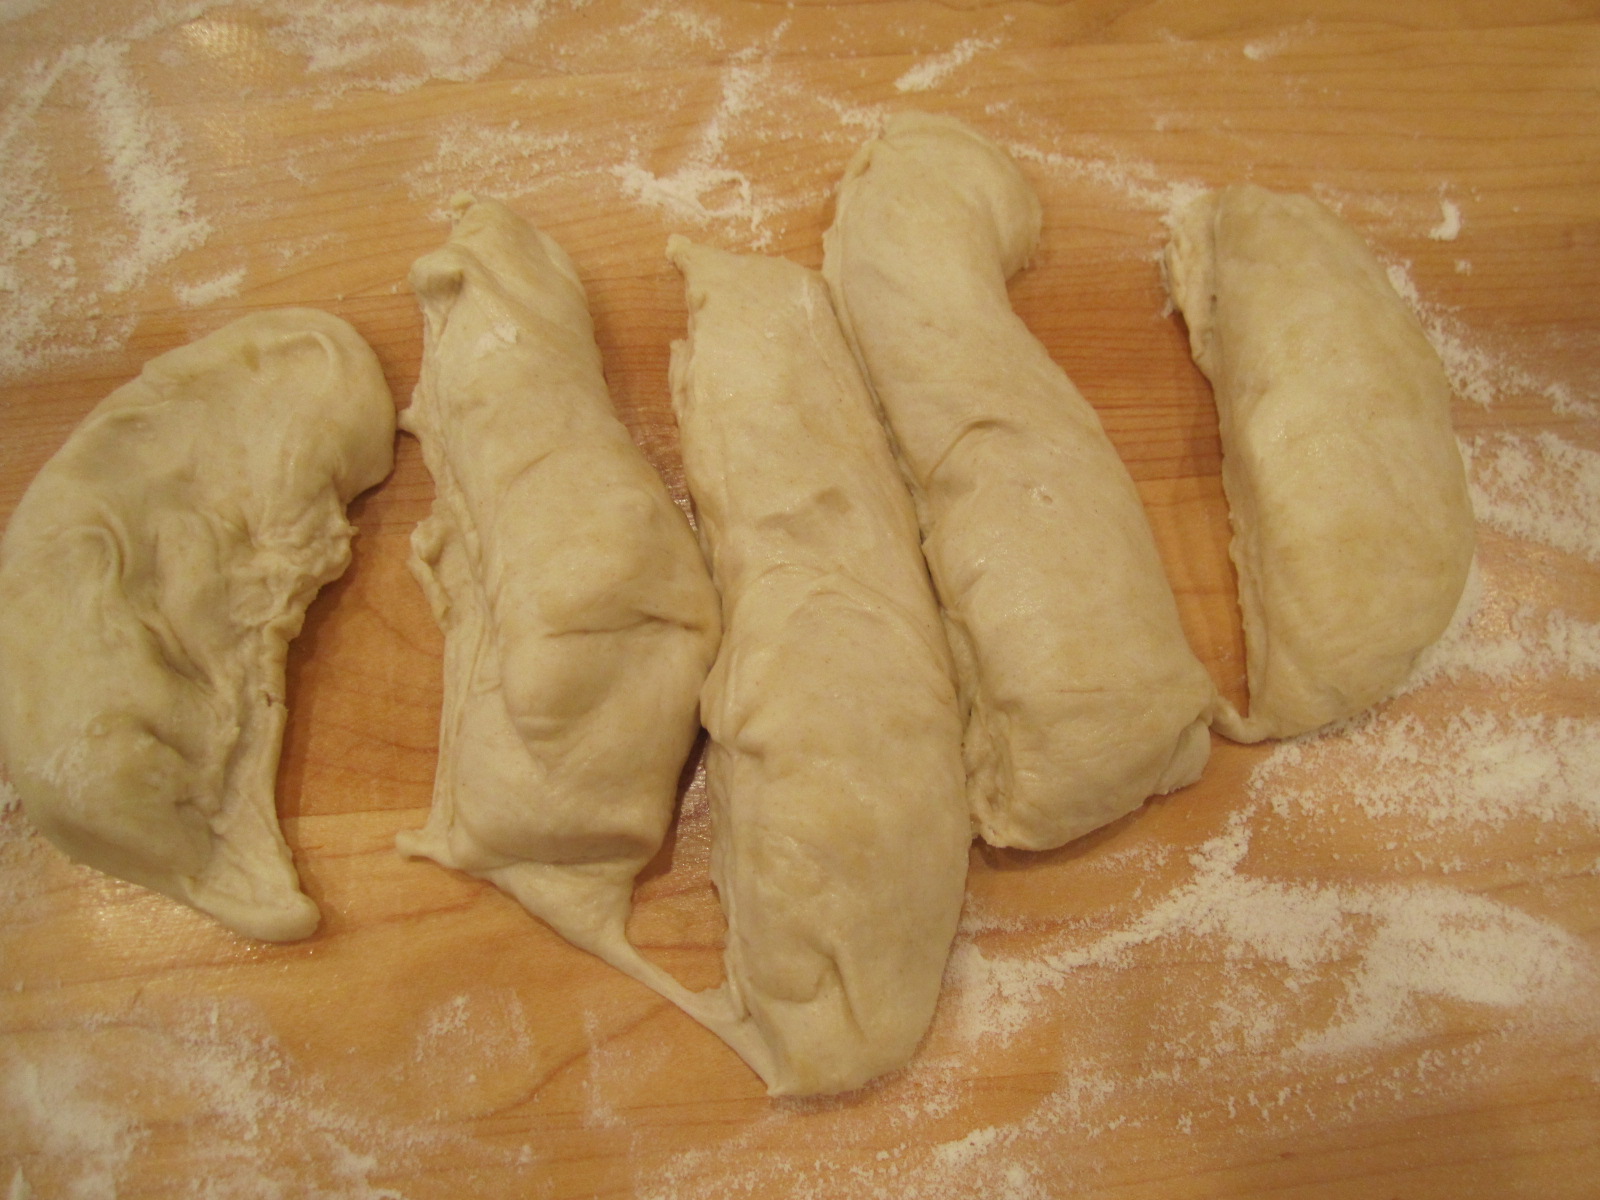
7. After the dough has rested, cut the ball into five equal pieces.

8. Roll these five equal pieces out into 1/3 inch thick pieces of rope.

9. Cut these ropes into one inch pieces.


10. For each of these one inch pieces, use two fingers and push your fingertips into the dough and pull it towards you to from a horizontal line, almost like folding the dough over upon itself, but without the two sides connecting. This would be a very fun thing to do with little ones, some of mine actually look like a 3 year old had a lot of fun! In the end, it really doesn't matter the shape of the dough, it all tastes delicious. However, do try to keep the pieces about the same thickness for cooking purposes.


11. Bring a large pot of salted water to a boil. It is really important to use a large pot with lot of water so that the pasta will not stick together.

12. Add the pasta and boil until tender but still al dente (firm to the bite). This should take about 10 minutes.

So...this strainer is one of the best things I have ever gotten for my kitchen. I received this during a bridal shower and it is actually a Wok Strainer, but I have found it so useful for lifting anything hot out of a boiling pot of water, as I am not the strongest person in the world and I have puppies under-foot, I am always worried about tripping on my way to the strainer in the sink with a huge pot of boiling water, and thus spilling hot water on myself of on the puppies. Here is a place (Sur La Table...one of my favorite places to shop and take cooking classes) you can find this useful kitchen tool: http://www.surlatable.com/product/PRO-15547/Wok-Skimmer
13. Drain the pasta and then add to the prepared sauce in the pan in which you prepared the sauce.


Steps for Sauce:
1. Heat a tablespoon of olive oil in a heavy saucepan over medium heat. (The original recipe called for 1/2 cup of olive oil, I do not think this much oil is necessary or tasty. So, I used about a tablespoon of olive oil and a few sprays of Pam, and it worked out just perfectly.)
2. Add the chopped onion, pancetta, and red pepper flakes to the oil. (Have these prepared and ready to go for a more enjoyable cooking experience).


3. Saute for about 10 to 15 minutes.
4. Add a half a cup of white wine (I used the wine we were going to drink with dinner) to the pan to deglaze the deliciousness that sticks to the pan.


6. Add the cherry tomatoes and sauce to the pan and cook until softened and breaking, about 10 minutes.


7. Add a ladle or two of the pasta water to the sauce to add some liquid and develop the flavor.
8. Lower the heat to low.

9. Add the cooked pasta to the sauce.


11. Add the 16 basil leaves and the copped oregano.


11. Feel free to add some shaved Pecorino Romano cheese to the top of the pasta, I forgot...therefore I now need to find a recipe which calls for this cheese, as I have a whole wedge ready to go...oops!
12.Enjoy this luscious creation with someone you love, whoever that may be, I hope you include yourself in those whom you love, as that is indeed the most important person in your life whom you should love with all your heart.


Puppy love!